16-实战练习 LCEL 组装 chain
前言
我们学了 LangChain 的各种功能:tool、mcp、RAG、memory、prompt template、output parser 等,并且学了 LCEL 的写法,把流程组装成 chain 来调用。
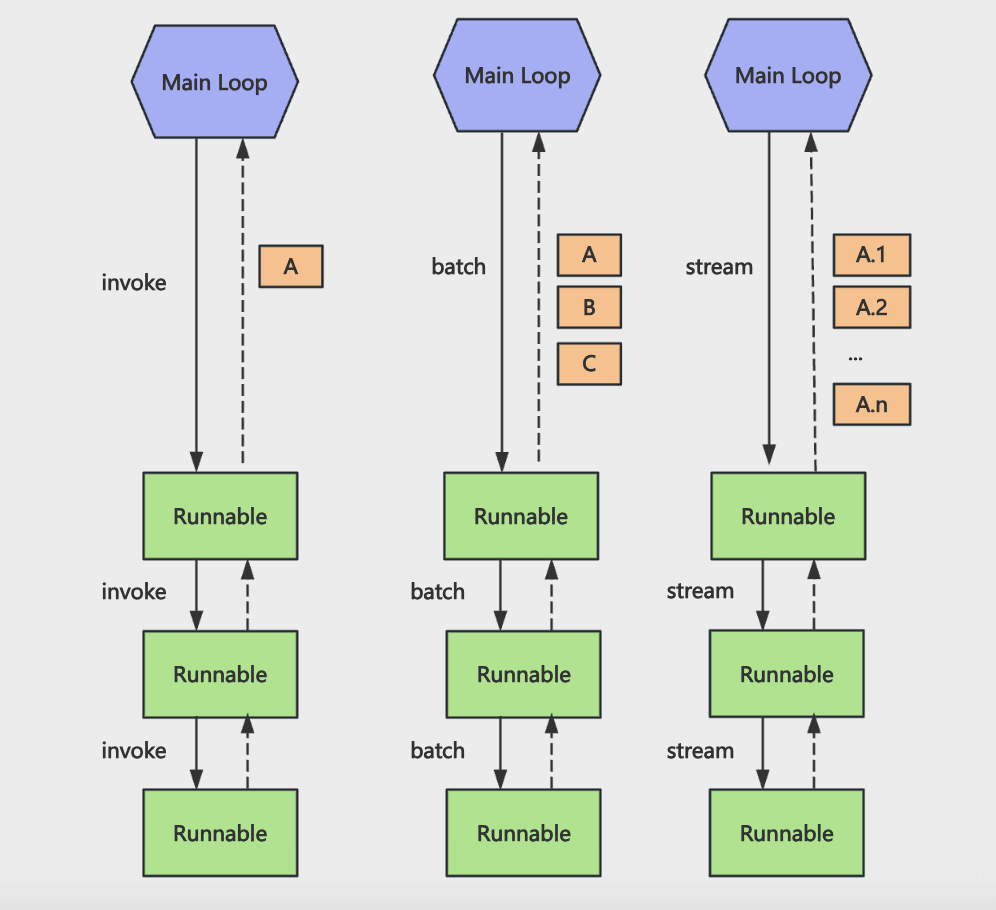
LCEL 就是基于 Runnable 的 api 来声明 chain,然后统一执行。
声明的 chain 可以用 invoke、batch、stream 等 api 来同步调用、批量调用、流式返回,因为所有 Runnable 都实现了这些方法。
但是大家可能对用了 Runnable 之后和之前的写法的区别没有具体的认识。
这节我们就把之前做过的一些小实战用 LCEL 的方式再写一遍。
这两个:
- 高德 mcp + Chrome Devtools MCP
- RAG + Milvus 电子书语义助手
功能一样,大家感受下写法上的区别,体会下 LCEL 的好处。
高德 mcp + Chrome Devtools MCP
首先我们分析下之前 tool-test 项目里 mcp 的那个案例用 LCEL 的方式应该怎么写:
import 'dotenv/config'
import { MultiServerMCPClient } from '@langchain/mcp-adapters'
import { ChatOpenAI } from '@langchain/openai'
import chalk from 'chalk'
import {
  HumanMessage,
  SystemMessage,
  ToolMessage,
} from '@langchain/core/messages'

const model = new ChatOpenAI({
  modelName: 'qwen-plus',
  apiKey: process.env.OPENAI_API_KEY,
  configuration: {
    baseURL: process.env.OPENAI_BASE_URL,
  },
})

const mcpClient = new MultiServerMCPClient({
  mcpServers: {
    'my-mcp-server': {
      command: 'node',
      args: ['/Users/mac/jiuci/github/aiagent/src/4/my-mcp-server.mjs'],
    },
    'amap-maps-streamableHTTP': {
      url: 'https://mcp.amap.com/mcp?key=' + process.env.AMAP_MAPS_API_KEY,
    },
    filesystem: {
      command: 'npx',
      args: [
        '-y',
        '@modelcontextprotocol/server-filesystem',
        '/Users/mac/jiuci/github/aiagent',
      ],
    },
    'chrome-devtools': {
      command: 'npx',
      args: ['-y', 'chrome-devtools-mcp@latest'],
    },
  },
})

const tools = await mcpClient.getTools()
const modelWithTools = model.bindTools(tools)

async function runAgentWithTools(query, maxIterations = 30) {
  const messages = [new HumanMessage(query)]

  for (let i = 0; i < maxIterations; i++) {
    console.log(chalk.bgGreen(`⏳ 正在等待 AI 思考...`))
    const response = await modelWithTools.invoke(messages)
    messages.push(response)

    // 检查是否有工具调用
    if (!response.tool_calls || response.tool_calls.length === 0) {
      console.log(`\n✨ AI 最终回复:\n${response.content}\n`)
      return response.content
    }

    console.log(
      chalk.bgBlue(`🔍 检测到 ${response.tool_calls.length} 个工具调用`),
    )
    console.log(
      chalk.bgBlue(
        `🔍 工具调用: ${response.tool_calls.map(t => t.name).join(', ')}`,
      ),
    )
    // 执行工具调用
    for (const toolCall of response.tool_calls) {
      const foundTool = tools.find(t => t.name === toolCall.name)
      if (foundTool) {
        const toolResult = await foundTool.invoke(toolCall.args)

        // LangChain 要求 content 必须是 string,对象会导致 message.content.map is not a function
        let contentStr
        if (typeof toolResult === 'string') {
          contentStr = toolResult
        } else if (toolResult && typeof toolResult.text === 'string') {
          contentStr = toolResult.text
        } else if (toolResult !== null && toolResult !== undefined) {
          contentStr = JSON.stringify(toolResult)
        } else {
          contentStr = ''
        }

        messages.push(
          new ToolMessage({
            content: contentStr,
            tool_call_id: toolCall.id,
          }),
        )
      }
    }
  }

  return messages[messages.length - 1].content
}

await runAgentWithTools(
  '北京南站附近的酒店,最近的 3 个酒店,拿到酒店图片,打开浏览器,展示每个酒店的图片,每个 tab 一个 url 展示,并且在把那个页面标题改为酒店名',
)

await mcpClient.close()
经过分析:
bindTools 之后的 model 是一个 Runnable
Prompt Template 是一个 Runnable
调用大模型返回的结果处理,有个 if else 逻辑,可以封装成 RunnableBranch
然后具体处理 tool call 的逻辑可以封装成 RunnableLamda
把这个 chain 组装好,统一调用就好了。
import 'dotenv/config'
import { MultiServerMCPClient } from '@langchain/mcp-adapters'
import { ChatOpenAI } from '@langchain/openai'
import chalk from 'chalk'
import { HumanMessage, ToolMessage } from '@langchain/core/messages'
import {
  ChatPromptTemplate,
  MessagesPlaceholder,
} from '@langchain/core/prompts'
import {
  RunnableSequence,
  RunnableLambda,
  RunnableBranch,
  RunnablePassthrough,
} from '@langchain/core/runnables'

const model = new ChatOpenAI({
  modelName: 'qwen-plus',
  apiKey: process.env.OPENAI_API_KEY,
  configuration: {
    baseURL: process.env.OPENAI_BASE_URL,
  },
})

const mcpClient = new MultiServerMCPClient({
  mcpServers: {
    'amap-maps-streamableHTTP': {
      url: 'https://mcp.amap.com/mcp?key=' + process.env.AMAP_MAPS_API_KEY,
    },
    'chrome-devtools': {
      command: 'npx',
      args: ['-y', 'chrome-devtools-mcp@latest'],
    },
  },
})

const tools = await mcpClient.getTools()
const modelWithTools = model.bindTools(tools)

const prompt = ChatPromptTemplate.fromMessages([
  ['system', '你是一个可以调用 MCP 工具的智能助手。'],
  new MessagesPlaceholder('messages'),
])

const llmChain = prompt.pipe(modelWithTools)

// 1. 定义处理工具调用的逻辑 (封装为 Runnable)
const toolExecutor = new RunnableLambda({
  func: async input => {
    const { response, tools } = input
    const toolResults = []

    for (const toolCall of response.tool_calls ?? []) {
      const foundTool = tools.find(t => t.name === toolCall.name)
      if (!foundTool) continue

      const toolResult = await foundTool.invoke(toolCall.args)

      // 兼容不同返回格式的字符串化
      const contentStr =
        typeof toolResult === 'string'
          ? toolResult
          : toolResult?.text || JSON.stringify(toolResult)

      toolResults.push(
        new ToolMessage({
          content: contentStr,
          tool_call_id: toolCall.id,
        }),
      )
    }

    return toolResults
  },
})

// 2. 对结果的处理
const agentStepChain = RunnableSequence.from([
  // step1: 将 LLM 输出挂到 state.response 上
  RunnablePassthrough.assign({
    response: llmChain,
  }),
  // step2: 使用 RunnableBranch 根据是否有 tool_calls 走不同分支
  RunnableBranch.from([
    // 分支1:没有 tool_calls,认为本轮已经完成
    [
      state =>
        !state.response?.tool_calls || state.response.tool_calls.length === 0,
      new RunnableLambda({
        func: async state => {
          const { messages, response } = state
          const newMessages = [...messages, response]
          return {
            ...state,
            messages: newMessages,
            done: true,
            final: response.content,
          }
        },
      }),
    ],
    // 默认分支:有 tool_calls,调用工具并把 ToolMessage 写回 messages
    RunnableSequence.from([
      new RunnableLambda({
        func: async state => {
          const { messages, response } = state
          const newMessages = [...messages, response]

          console.log(
            chalk.bgBlue(`🔍 检测到 ${response.tool_calls.length} 个工具调用`),
          )
          console.log(
            chalk.bgBlue(
              `🔍 工具调用: ${response.tool_calls.map(t => t.name).join(', ')}`,
            ),
          )

          return {
            ...state,
            messages: newMessages,
          }
        },
      }),
      // 调用工具执行器,得到 toolMessages
      RunnablePassthrough.assign({
        toolMessages: toolExecutor,
      }),
      new RunnableLambda({
        func: async state => {
          const { messages, toolMessages } = state
          return {
            ...state,
            messages: [...messages, ...(toolMessages ?? [])],
            done: false,
          }
        },
      }),
    ]),
  ]),
])

async function runAgentWithTools(query, maxIterations = 30) {
  let state = {
    messages: [new HumanMessage(query)],
    done: false,
    final: null,
    tools,
  }

  for (let i = 0; i < maxIterations; i++) {
    console.log(chalk.bgGreen(`⏳ 正在等待 AI 思考...`))

    // 每一轮都通过一个完整的 Runnable chain(LLM + 工具调用处理)
    state = await agentStepChain.invoke(state)

    if (state.done) {
      console.log(`\n✨ AI 最终回复:\n${state.final}\n`)
      return state.final
    }
  }

  return state.messages[state.messages.length - 1].content
}

await runAgentWithTools(
  '北京南站附近的酒店,最近的 3 个酒店,拿到酒店图片,打开浏览器,展示每个酒店的图片,每个 tab 一个 url 展示,并且在把那个页面标题改为酒店名',
)

// await mcpClient.close();
我们加了一个 state 在多个 Runnable 之间传递,记录了 messages 数组、是否 done、以及最终的回复 final 以及所有 tools
let state = {
  messages: [new HumanMessage(query)],
  done: false,
  final: null,
  tools,
}
后面的一堆解释看不懂,后面直接研究代码吧
RAG + Milvus 电子书语义助手
然后再改造下之前那个 RAG + Milvus 的电子书语义助手
整个流程比较简单,我们改成 Runnable 版本
创建 src/cases/ebook-reader-rag.mjs
import 'dotenv/config'
import { ChatOpenAI, OpenAIEmbeddings } from '@langchain/openai'
import { RunnableSequence, RunnableLambda } from '@langchain/core/runnables'
import { MilvusClient, MetricType } from '@zilliz/milvus2-sdk-node'
import { PromptTemplate } from '@langchain/core/prompts'
import { StringOutputParser } from '@langchain/core/output_parsers'

const COLLECTION_NAME = 'ebook_collection'
const VECTOR_DIM = 1024

// 初始化 OpenAI Chat 模型
const model = new ChatOpenAI({
  temperature: 0.7,
  modelName: process.env.MODEL_NAME,
  apiKey: process.env.OPENAI_API_KEY,
  configuration: {
    baseURL: process.env.OPENAI_BASE_URL,
  },
})

// 初始化 Embeddings 模型
const embeddings = new OpenAIEmbeddings({
  apiKey: process.env.OPENAI_API_KEY,
  model: process.env.EMBEDDINGS_MODEL_NAME,
  configuration: {
    baseURL: process.env.OPENAI_BASE_URL,
  },
  dimensions: VECTOR_DIM,
})

// 初始化原生 Milvus 客户端
const milvusClient = new MilvusClient({
  address: 'localhost:19530',
})

// 从 Milvus 中检索内容的 Runnable
const milvusSearch = new RunnableLambda({
  func: async input => {
    const { question, k = 5 } = input

    try {
      // 1. 生成问题向量
      const queryVector = await embeddings.embedQuery(question)

      // 2. 调用 Milvus 搜索
      const searchResult = await milvusClient.search({
        collection_name: COLLECTION_NAME,
        vector: queryVector,
        limit: k,
        metric_type: MetricType.COSINE,
        output_fields: ['id', 'book_id', 'chapter_num', 'index', 'content'],
      })

      const results = searchResult.results ?? []
      const retrievedContent = results.map((item, idx) => ({
        id: item.id,
        book_id: item.book_id,
        chapter_num: item.chapter_num,
        index: item.index ?? idx,
        content: item.content,
        score: item.score,
      }))

      return { question, retrievedContent }
    } catch (error) {
      console.error('检索内容时出错:', error.message)
      return { question, retrievedContent: [] }
    }
  },
})

// PromptTemplate:负责把 context / question 拼成最终 prompt
const promptTemplate = PromptTemplate.fromTemplate(
  `你是一个专业的《天龙八部》小说助手。基于小说内容回答问题,用准确、详细的语言。

请根据以下《天龙八部》小说片段内容回答问题:
{context}

用户问题: {question}

回答要求:
1. 如果片段中有相关信息,请结合小说内容给出详细、准确的回答
2. 可以综合多个片段的内容,提供完整的答案
3. 如果片段中没有相关信息,请如实告知用户
4. 回答要准确,符合小说的情节和人物设定
5. 可以引用原文内容来支持你的回答

AI 助手的回答:`,
)

// 构建 context + 日志打印的 Runnable
const buildPromptInput = new RunnableLambda({
  func: async input => {
    const { question, retrievedContent } = input

    if (!retrievedContent.length) {
      return {
        hasContext: false,
        question,
        context: '',
        retrievedContent,
      }
    }

    // 打印检索结果
    console.log('='.repeat(80))
    console.log(`问题: ${question}`)
    console.log('='.repeat(80))
    console.log('\n【检索相关内容】')

    retrievedContent.forEach((item, i) => {
      console.log(`\n[片段 ${i + 1}] 相似度: ${item.score ?? 'N/A'}`)
      console.log(`书籍: ${item.book_id}`)
      console.log(`章节: 第 ${item.chapter_num} 章`)
      console.log(`片段索引: ${item.index}`)
      const content = item.content ?? ''
      console.log(
        `内容: ${content.substring(0, 200)}${content.length > 200 ? '...' : ''}`,
      )
    })

    const context = retrievedContent
      .map((item, i) => {
        return `[片段 ${i + 1}]
章节: 第 ${item.chapter_num} 章
内容: ${item.content}`
      })
      .join('\n\n━━━━━\n\n')

    return {
      hasContext: true,
      question,
      context,
      retrievedContent,
    }
  },
})

// 组合成完整的 RAG Runnable(检索 -> 构建 Prompt 输入 -> PromptTemplate -> LLM -> 文本)
const ragChain = RunnableSequence.from([
  milvusSearch,
  buildPromptInput,
  new RunnableLambda({
    func: async input => {
      const { hasContext, question, context } = input

      if (!hasContext) {
        const fallback =
          '抱歉,我没有找到相关的《天龙八部》内容。请尝试换一个问题。'
        console.log(fallback)
        return { question, context: '', answer: fallback, noContext: true }
      }

      // PromptTemplate 需要 { question, context }
      return { question, context, noContext: false }
    },
  }),
  promptTemplate,
  model,
  new StringOutputParser(),
])

async function initMilvusCollection() {
  console.log('连接到 Milvus...')
  await milvusClient.connectPromise
  console.log('✓ 已连接\n')

  try {
    await milvusClient.loadCollection({ collection_name: COLLECTION_NAME })
    console.log('✓ 集合已加载\n')
  } catch (error) {
    if (!error.message.includes('already loaded')) {
      throw error
    }
    console.log('✓ 集合已处于加载状态\n')
  }
}

async function main() {
  try {
    await initMilvusCollection()

    const input = {
      question: '鸠摩智会什么武功?',
      k: 5,
    }

    console.log('='.repeat(80))
    console.log(`问题: ${input.question}`)
    console.log('='.repeat(80))
    console.log('\n【AI 流式回答】\n')

    const stream = await ragChain.stream(input)

    for await (const chunk of stream) {
      process.stdout.write(chunk)
    }

    console.log('\n')
  } catch (error) {
    console.error('错误:', error.message)
  }
}

await main()
整个 chain 是这样的:
const ragChain = RunnableSequence.from([
  milvusSearch,
  buildPromptInput,
  new RunnableLambda({
    func: async input => {
      const { hasContext, question, context } = input

      if (!hasContext) {
        const fallback =
          '抱歉,我没有找到相关的《天龙八部》内容。请尝试换一个问题。'
        console.log(fallback)
        return { question, context: '', answer: fallback, noContext: true }
      }

      // PromptTemplate 需要 { question, context }
      return { question, context, noContext: false }
    },
  }),
  promptTemplate,
  model,
  new StringOutputParser(),
])
检索 Milvus -> 构建带有文档片段的 prompt -> 调用大模型 -> 打印结果
组装检索向量库的 chain:
这里用 StringOutputParser 把大模型返回结果变为字符串,然后用 stream 流式打印
通过这两个案例,我们就知道怎么用 Runnable 的方式来写逻辑了:
- 分析整个流程,拆成原子步骤
- 根据步骤之间的关系选择组件(线性、分支、并行、自定义逻辑等)
- 统一调用(invoke、stream、batch)
而且用 chain 的方式来写有很多好处,可以在每个节点上加一些逻辑,比如重试、传入配置、回调等。
重试逻辑
创建 src/runnables/RunnableWithRetry.mjs
import 'dotenv/config'
import { RunnableLambda } from '@langchain/core/runnables'

let attempt = 0

// 一个会随机失败的 Runnable,用来演示 withRetry
const unstableRunnable = RunnableLambda.from(async input => {
  attempt += 1
  console.log(`第 ${attempt} 次尝试,输入: ${input}`)

  // 模拟 70% 概率失败的情况
  if (Math.random() < 0.7) {
    console.log('本次尝试失败,抛出错误。')
    thrownewError('模拟的随机错误')
  }

  console.log('本次尝试成功。')
  return `成功处理: ${input}`
})

// 使用 withRetry 为 runnable 加上重试逻辑
const runnableWithRetry = unstableRunnable.withRetry({
  // 总共最多 5 次尝试
  stopAfterAttempt: 5,
})

try {
  const result = await runnableWithRetry.invoke('演示 withRetry')
  console.log('✅ 最终结果:', result)
} catch (err) {
  console.error('❌ 重试多次后仍然失败:', err?.message ?? err)
}
我们用 withRetry 给某个 Runnable 节点加上重试逻辑。
70% 的概率失败,最多尝试 5 次。
跑一下:
mac@macdeMacBook-Air-3 aiagent % pnpm run runnable-with-retry

> ai@1.0.0 runnable-with-retry /Users/mac/jiuci/github/aiagent
> node src/16/RunnableWithRetry.mjs

第 1 次尝试,输入: 演示 withRetry
本次尝试成功。
✅ 最终结果: 成功处理: 演示 withRetry
mac@macdeMacBook-Air-3 aiagent % pnpm run runnable-with-retry

> ai@1.0.0 runnable-with-retry /Users/mac/jiuci/github/aiagent
> node src/16/RunnableWithRetry.mjs

第 1 次尝试,输入: 演示 withRetry
本次尝试失败,抛出错误。
第 2 次尝试,输入: 演示 withRetry
本次尝试失败,抛出错误。
第 3 次尝试,输入: 演示 withRetry
本次尝试成功。
✅ 最终结果: 成功处理: 演示 withRetry
我们简单的调用下 withRetry 就可以给这个 Runnable 节点加上重试逻辑,不用自己实现。
回退
除了重试外,还有回退,也就是备选的方案
src/runnables/RunnableWithFallbacks.mjs
import 'dotenv/config'
import { RunnableLambda } from '@langchain/core/runnables'

// 模拟三个"翻译服务",优先级从高到低

const premiumTranslator = RunnableLambda.from(async text => {
  console.log('[Premium] 尝试翻译...')
  // 模拟高级服务不可用
  thrownewError('Premium 服务超时')
})

const standardTranslator = RunnableLambda.from(async text => {
  console.log('[Standard] 尝试翻译...')
  // 模拟标准服务也挂了
  thrownewError('Standard 服务限流')
})

const localTranslator = RunnableLambda.from(async text => {
  console.log('[Local] 使用本地词典翻译...')
  const dict = { hello: '你好', world: '世界', goodbye: '再见' }
  const words = text.toLowerCase().split(' ')
  return words.map(w => dict[w] ?? w).join('')
})

// withFallbacks:依次尝试 premium → standard → local
const translator = premiumTranslator.withFallbacks({
  fallbacks: [standardTranslator, localTranslator],
})

const result = await translator.invoke('hello world')
console.log('翻译结果:', result)
通过 withFallbacks 传入几种备选方案。
当前面的报错时,会尝试后面的方案。
配置
比如配置:
src/runnables/RunnableWithConfig.mjs
import 'dotenv/config'
import { RunnableLambda, RunnableSequence } from '@langchain/core/runnables'

// 模拟一个简单的"用户数据库"
const mockUsers = new Map([
  [
    'user-123',
    {
      id: 'user-123',
      name: '神光',
      email: 'guang@example.com',
    },
  ],
])

// 节点1:根据 config.configurable.userId 查用户
const fetchUserFromConfig = RunnableLambda.from(async (input, config) => {
  const userId = config?.configurable?.userId

  console.log('【节点1】收到了通知内容:', input)
  console.log('【节点1】从 config 里拿到 userId:', userId)

  const user = userId ? mockUsers.get(userId) : null

  if (!user) {
    thrownewError('未找到用户,无法发送通知')
  }

  return {
    user,
    notification: input,
  }
})

// 节点2:根据 config.configurable.role 做权限判断
const checkPermissionByRole = RunnableLambda.from(async (state, config) => {
  const role = config?.configurable?.role ?? '普通用户'

  console.log('【节点2】当前角色:', role)

  const canSend = role === '管理员' || role === '运营' || role === '系统'

  if (!canSend) {
    thrownewError(`角色「${role}」无权限发送系统通知`)
  }

  return {
    ...state,
    role,
  }
})

// 节点3:根据 locale 生成最终通知文案
const formatNotificationByLocale = RunnableLambda.from(
  async (state, config) => {
    const locale = config?.configurable?.locale ?? 'zh-CN'

    console.log('【节点3】locale:', locale)

    let content
    if (locale === 'en-US') {
      content = `Dear ${state.user.name},\n\n${state.notification}\n\n(from role: ${state.role})`
    } else {
      content = `亲爱的 ${state.user.name},\n\n${state.notification}\n\n(发送人角色:${state.role})`
    }

    return {
      ...state,
      locale,
      finalContent: content,
    }
  },
)

// 把三个节点串起来
const chain = RunnableSequence.from([
  fetchUserFromConfig,
  checkPermissionByRole,
  formatNotificationByLocale,
])

// 使用 withConfig 为整个 chain 绑定统一的配置
const chainWithConfig = chain.withConfig({
  tags: ['demo', 'withConfig', 'notification'],
  metadata: {
    demoName: 'RunnableWithConfig',
  },
  configurable: {
    userId: 'user-123',
    role: '管理员',
    locale: 'zh-CN',
  },
})

// 再创建一个不同配置的 chainWithConfig2,使用英文 locale
const chainWithConfig2 = chain.withConfig({
  tags: ['demo', 'withConfig', 'notification-en'],
  metadata: {
    demoName: 'RunnableWithConfig2',
  },
  configurable: {
    userId: 'user-123',
    role: '运营',
    locale: 'en-US',
  },
})

// 输入为"要发送的通知文案"
const result =
  await chainWithConfig.invoke('你有一条新的系统通知,请及时查看。')
console.log('✅ 最终通知内容:\n', result.finalContent)

console.log('\n--- chainWithConfig2 ---\n')

const result2 = await chainWithConfig2.invoke(
  'System maintenance scheduled tonight.',
)
console.log('✅ 最终通知内容:\n', result2.finalContent)
我们用 withConfig 给 chain 传入配置,它会在每个 Runable 节点的第二个参数拿到。
我们在第一个节点根据配置拿用户信息,第二个节点根据配置做权限判断,第三个节点根据配置返回不同语言的内容。
通过 withConfig 可以给 chain 的每个节点加上配置信息,可以通过第二个参数取出来用。
跑一下:
mac@macdeMacBook-Air-3 aiagent % pnpm run runnable-with-config

> ai@1.0.0 runnable-with-config /Users/mac/jiuci/github/aiagent
> node src/16/RunnableWithConfig.mjs

【节点1】收到了通知内容: 你有一条新的系统通知,请及时查看。
【节点1】从 config 里拿到 userId: user-123
【节点2】当前角色: 管理员
【节点3】locale: zh-CN
✅ 最终通知内容:
 亲爱的 神光,

你有一条新的系统通知,请及时查看。

(发送人角色:管理员)

--- chainWithConfig2 ---

【节点1】收到了通知内容: System maintenance scheduled tonight.
【节点1】从 config 里拿到 userId: user-123
【节点2】当前角色: 运营
【节点3】locale: en-US
✅ 最终通知内容:
 Dear 神光,

System maintenance scheduled tonight.

(from role: 运营)
再就是每个节点可以加上一些回调逻辑:
src/runnables/RunnableWithCallbacks.mjs
import 'dotenv/config'
import { RunnableLambda, RunnableSequence } from '@langchain/core/runnables'

// 文本处理链:清洗 → 分词 → 统计
const clean = RunnableLambda.from(text => {
  return text.trim().replace(/\s+/g, ' ')
})

const tokenize = RunnableLambda.from(text => {
  return text.split(' ')
})

const count = RunnableLambda.from(tokens => {
  return { tokens, wordCount: tokens.length }
})

const chain = RunnableSequence.from([clean, tokenize, count])

// 用 callbacks 观测每一步的输出
const callback = {
  handleChainStart(chain) {
    const step = chain?.id?.[chain.id.length - 1] ?? 'unknown'
    console.log(`[START] ${step}`)
  },
  handleChainEnd(output) {
    console.log(`[END]   output=${JSON.stringify(output)}\n`)
  },
  handleChainError(err) {
    console.log(`[ERROR] ${err.message}\n`)
  },
}

const result = await chain.invoke('  hello   world   from   langchain  ', {
  callbacks: [callback],
})

console.log('结果:', result)
比如一条有三个节点的 chain,我们想知道每个节点的输出
但是直接加到节点逻辑里也不大好,这种就可以用 callback 来打印。
mac@macdeMacBook-Air-3 aiagent % pnpm run runnable-with-callbacks

> ai@1.0.0 runnable-with-callbacks /Users/mac/jiuci/github/aiagent
> node src/16/RunnableWithCallbacks.mjs

[START] RunnableSequence
[START] RunnableLambda
[END]   output={"output":"hello world from langchain"}

[START] RunnableLambda
[END]   output={"output":["hello","world","from","langchain"]}

[START] RunnableLambda
[END]   output={"tokens":["hello","world","from","langchain"],"wordCount":4}

[END]   output={"tokens":["hello","world","from","langchain"],"wordCount":4}

结果: { tokens: [ 'hello', 'world', 'from', 'langchain' ], wordCount: 4 }
所以,用 chain 的方式,可以给每个节点加很多逻辑,比之前的写法灵活很多。
总结
前面学了 LCEL 的 Runnable api,这节我们综合用了一下
用 Runnable 的方式重写了之前的 MCP、RAG 的案例代码。
用 Runnable 的流程是这样的:
- 分析流程,拆分原子步骤
- 根据步骤之间的关系,选择对应 Runable api
- 统一调用(invoke、stream、batch)
并且写好这个 chain 之后,可以灵活的加一些逻辑:
- withConfig 加入一些配置,chain 的节点可以通过第二个参数拿到
- withRetry 加上重试逻辑
- withFallback 加上备选方案
- callbacks 可以加一些回调函数,比如打印节点的输出
LCEL 是 LangChain 的灵魂,通过 Runnable 把所有的节点变成组件,随意组合使用,而且可以加入很多额外的逻辑。
后面的 LangGraph、LangSmith 也是基于 Runnable 的,需要熟练掌握这种声明式的代码写法。
解释代码
mcp-test.mjs
ebook-reader-rag.mjs
RunnableWithConfig.mjs